Evas GL Programming Guide
The Open Graphics Library (OpenGL) is a cross-language multi-platform application programming interface (API) for rendering 2D and 3D vector graphics. The API is typically used to interact with a graphics processing unit (GPU) to achieve hardware-accelerated rendering. The Evas_GL library provides access to the OpenGL API under the OpenGL for Embedded Systems 2.0 or 3.0 (OpenGL ES ) revision of the standard.
Prerequisites
This guide is aimed at programmers already proficient in C but requires no previous experience of OpenGL or graphics programming. A basic knowledge of algebra and geometry is helpful.
You will require a coding environment and toolchain, along with a copy of the latest version of the Enlightenment Foundation Libraries (EFL).
You'll also understand this guide more easily if you're familiar with Enlightenment Project Coding Conventions.
The Graphics Pipeline
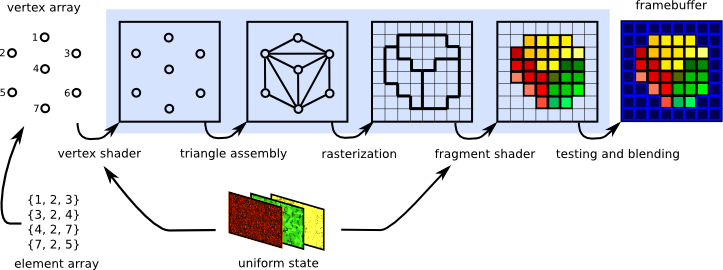
Computer-generated three-dimensional imagery is made up of triangles. The graphics pipeline that OpenGL implements reflects this. The host program fills OpenGL-managed memory buffers with arrays of vertices; these vertices are projected into screen space, assembled into triangles, and rasterized into pixel-sized fragments. Finally, the fragments are assigned color values and drawn to the framebuffer. Modern GPUs derive their flexibility from delegating the "project into screen space" and "assign color values" stages to programs called shaders.
The Vertex and Element Array
The graphics pipeline starts with a set of one or more vertex buffers filled with arrays of vertex attributes, which are used as inputs to the vertex shaders. The vertex attributes can be the location of the vertex in 3D space or some sets of texture coordinates that map the vertex to a sample point on one or more textures. This vertex array is the set of vertex buffers supplying data to the rendering job. When a render job is submitted an additional element array is supplied: an array of indexes into the vertex array to select which vertices get fed into the pipeline.
Uniform States and Textures
The uniform state provides a set of shared read-only values to the shaders at each programmable stage of the graphics pipeline. It allows the shader program to use parameters that don't change between vertices or fragments. The uniform state includes textures that are commonly used to map images onto surfaces. These textures are translated into one, two or three-dimensional arrays which can be sampled by shaders. They can be used as datasets for various kind of effects or as lookup tables for pre-calculated functions.
The Vertex Shader
The vertex shader is a program which takes a set of vertex attributes as inputs then outputs a new set of attributes. These are referred to as varying values and are provided to the rasterizer. The GPU begins by reading each selected vertex from the vertex array and running it through the vertex shader. The vertex shader calculates the projected position of the vertex in screen space. The vertex shader can also be used to generate other varying values such as a color or texture coordinates. These values can be used by the rasterizer to blend across the surface of the triangles connecting the vertex.
Triangle Assembly
The GPU connects the projected vertices to draw triangles by taking the vertices in the order specified by the element array, then collating them in groups of three. These groups can be organised in the following ways:
TRIANGLES- Take every three element group as an independent triangle.TRIANGLE_STRIP- Reuse the last two vertices of each triangle as the first two vertices of the next triangle.TRIANGLE_FAN- Connect the first element to every subsequent pair of elements.
The behavior of these three modes is demonstrated in the following diagram:

Rasterization
The rasterization step takes each triangle from the triangle assembly, clips it and discards the parts located outside of the screen. The remaining visible parts are then broken into pixel-sized fragments. The vertex shader's varying outputs are also interpolated across the rasterized surface of each triangle, assigning a smooth gradient of values to each fragment. If the vertex shader assigns a color value to each vertex, for instance, the rasterizer will blend those colors across the pixelated surface as shown here:

The Fragment Shader
The generated fragments pass through another program called the fragment shader. The fragment shader returns the color and the depth values that get drawn into the framebuffer. The most common fragment shader operations are lighting and texture mapping. The fragment shader is able to perform sophisticated special effects as it runs independently for every pixel drawn. This also makes it the most performance-sensitive part of the graphics pipeline.
Framebuffer, Testing and Blending
The rendering pipeline outputs to the framebuffer. OpenGL allows you to render the final scene to the screen using the default framebuffer, but it also lets you make framebuffer objects that draw into offscreen renderbuffers or into textures for use as inputs to other rendering jobs. With Evas_GL the framebuffer will typically be a single two-dimensional image widget.
In addition to the color buffers a framebuffer can have a depth buffer and/or a stencil buffer which can filter fragments before they are drawn. Depth testing discards fragments from objects that are behind the ones already drawn, while stencil testing uses shapes drawn into the stencil buffer to constrain the drawable part of the framebuffer. Fragments that remain have their color value alpha-blended with the color value they are overwriting. The final color, depth and stencil values are then drawn into the target buffers.
Benefits of Evas_GL
Evas_GL allows you to use OpenGL to render into specially configured image objects, which act as render target surfaces. This mechanism permits the application of all methods and callbacks provided by Elementary widgets directly into the framebuffer. Indeed, the framebuffer is a image widget with which in which you can manage events such as mouse movement, clicks or keyboard input. The rendering pipeline is implemented directly, within a function that will be called each time the program retrieves pixels from the image. Using an Ecore_Evas animation loop allows for pixels to be marked as "dirty" at each tick of the clock, meaning the animation must be updated each time Evas renders.
Evas_GL provides the OpenGL ES 1.x, 2.x and 3.x APIs, which give full control to the user. These versions of OpenGL contain functions that have been deprecated from earlier API versions such as matrix transformation, translation, and rotation. OpenGL ES 2.0 introduces the programmable pipeline to mobile devices, discarding the old fixed-pipeline approach. You may find it more difficult to use at first but it will become easier with practice. Additionally, it isn't too difficult to code the missing sections if you have a basic knowledge of math.
Declaration of Evas_GL Objects
Define the application data structure, which holds all the objects for an Evas_GL application as follows:
typedef struct appdata
{
   Evas_Object *win;
   Evas_Object *img;

   Evas_GL *evasgl;
   Evas_GL_API *glapi;
   Evas_GL_Context *ctx;
   Evas_GL_Surface *sfc;
   Evas_GL_Config *cfg;
   Evas_Coord sfc_w;
   Evas_Coord sfc_h;

   unsigned int program;
   unsigned int vtx_shader;
   unsigned int fgmt_shader;
   unsigned int vbo;
} appdata_s;
These functions are as follows:
Evas_Object *win- The application window.Evas_Object *img- The OpenGL ES canvas.Evas_GL *evasgl- AnEvas_GLobject for rendering OpenGL inEvas.Evas_GL_API *glapi- TheEvas_GLAPI object, which contains the OpenGL APIs.Evas_GL_Context *ctx- TheEvas_GLContext object, an OpenGL rendering context.Evas_GL_Surface *sfc- TheEvas_GLSurface object, an OpenGL rendering target.Evas_GL_Config *cfg- TheEvas_GLSurface Configuration object, for surface creation.
Creating the Elm Window and Evas_GL
To create the Elm window and EvasGL, proceed with the following steps.
Managing HW Acceleration
To develop a GL application you must call the elm_config_accel_preference_set() function before creating a window. This configures an application so it can use the system's GPU.
To use the Direct Rendering mode of Evas_GL you must set the same option values (depth, stencil and MSAA) to both a rendering engine and an Evas_GL_Surface object. You can set the option values to the rendering engine using the elm_config_accel_preference_set() function, and to the Evas_GL_Surface object using the Evas_GL_Config object. If the Evas_GL_Config object option values are higher than the rendering engine's values the Direct Rendering mode is disabled, or abnormal rendering may occur.
Evas_Object *win;

// To use OpenGL ES, the application must switch on hardware acceleration
// To enable that, call elm_config_accel_preference_set() with "opengl"
// before creating the Elm window
elm_config_accel_preference_set("opengl");
// Creating Elm window
ad->win = elm_win_util_standard_add("Evas_GL Example", "Evas_GL Example");
Create an Evas_GL handler using the evas_gl_new(Evas * e) function. This initializer takes as a parameter the Evas canvas. When developing an application with Elementary use the canvas of your window:
ad->evasgl = evas_gl_new(evas_object_evas_get(ad->win));Use the evas_gl_free(Evas_GL *evas_gl) function to free the memory allocated to this handler.
Creating a Surface
Allocate a new configuration object to fill the surface using the evas_gl_config_new() function. As long as Evas creates a config object for the user it takes care of any backwards compatibility issue. With the config object created, specify the surface settings:
appdata_s *ad;
ad->cfg = evas_gl_config_new();
ad->cfg->color_format = EVAS_GL_RGBA_8888; // Surface Color Format
ad->cfg->depth_bits = EVAS_GL_DEPTH_BIT_24; // Surface Depth Format
ad->cfg->stencil_bits = EVAS_GL_STENCIL_NONE; // Surface Stencil Format
ad->cfg->options_bits = EVAS_GL_OPTIONS_NONE; // Configuration options (here there are no extra options)
Now initialize the surface using evas_gl_surface_create(Evas_GL* evas_gl, Evas_GL_Config * cfg, int w, int h). This function takes the given Evas_GL object as the first parameter and the pixel format, and configuration of the rendering surface as the second parameter. The last two parameters are the width and height of the surface, which in this example is recovered directly from the window.
Evas_Coord w, h;
evas_object_geometry_get(ad->win, NULL, NULL, &w, &h);
ad->sfc = evas_gl_surface_create(ad->evasgl, ad->cfg, w, h);
To manually delete a GL surface use the evas_gl_surface_destroy(Evas_GL *evas_gl, Evas_GL_Surface *surf) function.
Creating a Context
Create a context for Evas_GL using the evas_gl_context_create(Evas_GL *evas_gl, Evas_GL_Context * share_ctx) function. To merge the context with a higher context definition, pass a second parameter.
ad->ctx = evas_gl_context_create(ad->evasgl, NULL);To delete the context later, use the evas_gl_context_destroy(Evas_GL *evas_gl, Evas_GL_Context *ctx) function. To delete the entire configuration object instead, use evas_gl_config_free(Evas_GL_Config *cfg).
Getting OpenGL ES APIs
To get the API of OpenGL ES use the evas_gl_api_get(Evas_GL *evas_gl_)function. This function returns a structure that contains all OpenGL ES functions you can use to render in Evas, consisting of all standard OpenGL ES 3.0 functions and any additional functions Evas provides. If you already have your code ported to OpenGL ES 3.0 it is easy to render to Evas.
If you use a global macro, such as EVAS_GL_GLOBAL_GLES2_XXX, you do not need to do this.
ad->glapi = evas_gl_api_get(ad->evasgl);Callbacks
Following the configuration of the Evas_GL environment, declare a user interface component in which all the OpenGL ES transformation will take place. In the example below the image component is used, as it provides callbacks that allow for simple interaction with mouse events and coordinates. Set up an image object that inherits the size of the parent window:
ad->img = evas_object_image_filled_add(evas_object_evas_get(ad->win));All the OpenGL ES statements in charge of rendering the scene are placed in the following callback:
evas_object_image_pixels_get_callback_set(ad->img, img_pixels_get_cb, ad);The "OpenGL ES main loop" function is called every time the program attempts to access pixels from the image. This function is defined as follows:
static void
img_pixels_get_cb(void *data, Evas_Object *obj)
{
   appdata_s *ad = data;
   Evas_GL_API *gl = ad->glapi;

   // Rendering process
   evas_gl_make_current(ad->evasgl, ad->sfc, ad->ctx);
   // Because the surface size can be changed, set the viewport in this callback
   gl->glViewport(0, 0, ad->sfc_w, ad->sfc_h);
   // Paint it blue
   gl->glClearColor(0.2, 0.2, 0.6, 1.0);
   gl->glClear(GL_COLOR_BUFFER_BIT);
   // The usual OpenGL ES draw commands come here
   // draw_scene();
}
At every tick, the given context must be set as the current context for the given surface using the evas_gl_make_current(Evas_GL *evas_gl, Evas_GL_Surface *surf, Evas_GL_Context *ctx) function.
Ecore_Animator can be used to define the OpenGL ES main loop. To do so, create a callback that is called on every animation tick. This animation callback is used only to mark the image as "dirty". This then calls the pixel-get callback which redraws the scene.
static Eina_Bool
animate_cb(void *data)
{
   Evas_Object *img = data;
   evas_object_image_pixels_dirty_set(img, EINA_TRUE);

   return ECORE_CALLBACK_RENEW;
}

ecore_animator_add(animate_cb, ad->img);
You can define several other callbacks that have an impact on drawing depending on mouse, resize and deletion events.
evas_object_event_callback_add(ad->img, EVAS_CALLBACK_DEL, img_del_cb, ad);
evas_object_event_callback_add(ad->img, EVAS_CALLBACK_MOUSE_DOWN, mouse_down_cb, ad);
evas_object_event_callback_add(ad->img, EVAS_CALLBACK_MOUSE_UP, mouse_up_cb, ad);
evas_object_event_callback_add(ad->img, EVAS_CALLBACK_MOUSE_MOVE, mouse_move_cb, ad);
evas_object_event_callback_add(ad->win, EVAS_CALLBACK_RESIZE, win_resize_cb, ad);
Because the window size can be changed you must set a resize callback. You must additionally create an Evas_GL_Surface within the resize callback and reset the viewport size with the new window size:
static void
win_resize_cb(void *data, Evas *e, Evas_Object *obj, void *event_info)
{
   appdata_s *ad = data;

   if (ad->sfc)
     {
        evas_object_image_native_surface_set(ad->img, NULL);
        evas_gl_surface_destroy(ad->evasgl, ad->sfc);
        ad->sfc = NULL;
     }

   evas_object_geometry_get(obj, NULL, NULL, &ad->sfc_w, &ad->sfc_h);
   evas_object_image_size_set(ad->img, ad->sfc_w, ad->sfc_h);
   evas_object_resize(ad->img, ad->sfc_w, ad->sfc_h);
   evas_object_show(ad->img);

   if (!ad->sfc)
     {
        Evas_Native_Surface ns;

        ad->sfc = evas_gl_surface_create(ad->evasgl, ad->cfg, ad->sfc_w, ad->sfc_h);
        evas_gl_native_surface_get(ad->evasgl, ad->sfc, &ns);
        evas_object_image_native_surface_set(ad->img, &ns);
        evas_object_image_pixels_dirty_set(ad->img, EINA_TRUE);
     }
}
Setting a Surface into the Image Object
You can also fill in the native Surface information from the given Evas_GL surface. To adapt the surface to the target image when the size of the canvas changes, for instance:
Evas_Native_Surface ns;
evas_gl_native_surface_get(ad->evasgl, ad->sfc, &ns);
evas_object_image_native_surface_set(ad->img, &ns);
Further Reading
- GL 2D Tutorial
- A tutorial on two-dimensional graphics handling via OpenGL.