Graphical "Hello World" in C#
In this guide you will learn how to build a complete graphical application, with a window and typical elements like a text box and a button.
| WARNING | ||
|---|---|---|
 |
Some C# classes are currently in BETA state They should only be used for experimenting and NOT for any product development. These classes are marked as BETA in the reference documentation. The source code for the tutorials is subject to change in the future. |
|
Prerequisites
- Read the Setting Up a C# Development Environment guide so you are able to build and run EFL C# applications.
- This tutorial builds on top of the previous one, "Hello World" in C#, so you should have read that one first.
Graphical Hello World
Copy the code below into a file and build as instructed in the Setting Up a C# Development Environment guide.
using System;
public class Example
{
// Callback to quit the application
public static void QuitCb(object sender, Efl.Gfx.EntityVisibilityChangedEvt_Args e)
{
// Exit the EFL main loop
if (e.arg == false)
Efl.Ui.Config.Exit();
}
#if WIN32
[STAThreadAttribute()]
#endif
public static void Main()
{
// Initialize EFL and all UI components
Efl.All.Init(Efl.Components.Ui);
// Create a window and initialize it
Efl.Ui.Win win = new Efl.Ui.Win(Efl.App.AppMain);
// Set the window's title
win.SetText("Hello World");
// Request that the window is automatically hidden when the "close"
// button is pressed
win.SetAutohide(true);
// Hook to the Hide event
win.VisibilityChangedEvt += QuitCb;
// Create a box container
var box = new Efl.Ui.Box(win);
// Set its minimum size
box.SetHintSizeMin(new Eina.Size2D(360, 240));
// Set the box as the content for the window
// The window size will adapt to the box size
win.SetContent(box);
// Create a text label widget
var label = new Efl.Ui.Text(box);
// Set its content and customize it
label.SetText("Hello World. This is an Efl.Ui application!");
label.SetSelectionAllowed(false);
label.SetHintWeight(1.0, 0.9);
label.SetHintAlign(0.5, 0.5);
// Add the text to the box container
box.DoPack(label);
// Create a button widget
var button = new Efl.Ui.Button(box);
// Customize it
button.SetText("Quit");
button.SetHintWeight(1.0, 0.1);
// Set the method to be called when the button is pressed
button.ClickedEvt += (object sender, EventArgs e) => { Efl.Ui.Config.Exit(); };
// Add the button to the box container
box.DoPack(button);
// Start the EFL main loop
Efl.Ui.Config.Run();
// Shutdown EFL
Efl.All.Shutdown();
}
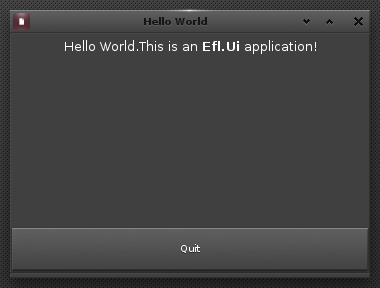
}When you run the application, it should look something like this:
Walkthrough
This tutorial builds on top of the previous one, "Hello World" in C#, so the basic structure, including EFL initialization and shutdown, are the same. The following steps explain how to further customize the window and add the different widgets to it.
Registering for Window Events
Take a look at the window instantiation:
        // Create a window and initialize it
        Efl.Ui.Win win = new Efl.Ui.Win(Efl.App.AppMain);
        // Set the window's title
        win.SetText("Hello World");
        // Request that the window is automatically hidden when the "close"
        // button is pressed
        win.SetAutohide(true);
        // Hook to the Hide event
        win.VisibilityChangedEvt += QuitCb;
This creates a new window, making it a child of the application's Main Loop, and customizes it:
- Sets the window title to
Hello World. - Sets the
Autohideflag totrue(see the previous tutorial). - Connects an event handler to the window's
Visibility Changed Event. This event will be emitted every time the window is shown or hidden. In particular, it will be emitted when the window is closed due to theAutohideflag above.
All event handlers in EFL have a common signature:
public static void Handler(object sender, EventArgs e);Where sender is the object that emitted the event, and e contains any additional information, which depends on the type of the event.
If you want to retrieve any additional information, though, you have to use the appropriate EventArgs subclass. For instance, in this tutorial:
public static void QuitCb(object sender, Efl.Gfx.EntityVisibilityChangedEvt_Args e);where you can retrieve the new visibility status of the window in the e.arg parameter (true for window shown or false for window hidden).
This tutorial simply quits the application whenever the window is hidden:
    // Callback to quit the application
    public static void QuitCb(object sender, Efl.Gfx.EntityVisibilityChangedEvt_Args e)
    {
        // Exit the EFL main loop
        if (e.arg == false)
          Efl.Ui.Config.Exit();
    }
This is already the default behavior for EFL applications, so this event is connected here just for demonstration purposes.
Adding a Container Box
Now you could start adding widgets directly to your window, but you would need to manually give them a position and a size. If later on you decide to make your window bigger, or if you want your window to be resizable by the user, you'll need to change the position and size of every widget.
It is easier to put your widgets inside a container which takes care of positioning and sizing them, according to available space and other widgets. There's a variety of containers available, which allow you to stack your widgets vertically or horizontally, or align them on a square grid, for example.
Although invisible themselves, containers are regular widgets too, so you can size and position them, and even nest them under other containers.
This tutorial uses a box container:
        // Create a box container
        var box = new Efl.Ui.Box(win);
        // Set its minimum size
        box.SetHintSizeMin(new Eina.Size2D(360, 240));
        // Set the box as the content for the window
        // The window size will adapt to the box size
        win.SetContent(box);
A box container can be vertical or horizontal, and by default it is vertical. All widgets inside a vertical box container will have the same width as the container, and their heights will be automatically chosen so that they cover the whole surface of the container from top to bottom (Imagine a stack of pizza boxes neatly fitting inside your oven). By default, all widgets will have the same height, but that can be customized as you will see in a moment.
In the snippet above you can see calls to:
SetHintSizeMin(): This sets the minimum size for the box. You can resize the window and the box will grow or shrink as needed, but it will never go below this size.SetContent(): This method specifies the one widget which will be the content of the window (Windows can only have one content set at any given time). If you want to have more than one widget in your window, you will need to wrap them in a container and set that as the content of the window. As shown above, the box container is set as the content of the window.
Adding a Text Label
So far the tutorial has created a window and an invisible container, it is about time it adds something which can actually be seen:
        // Create a text label widget
        var label = new Efl.Ui.Text(box);
        // Set its content and customize it
        label.SetText("Hello World. This is an Efl.Ui application!");
        label.SetSelectionAllowed(false);
        label.SetHintWeight(1.0, 0.9);
        label.SetHintAlign(0.5, 0.5);
        // Add the text to the box container
        box.DoPack(label);
This instantiates an Efl.Ui.Text object, as a child of the box container. Quite sensibly, this is the widget used to display text on screen. The snippet above is worth a careful look:
SetText(): Specifies the text string to display in the widget.SetSelectionAllowed(): This disables selecting the text (by dragging over it with the mouse, for example). Just to showcase a bit the EFL's capabilities.SetHintWeight(): This one controls the widget's size, but, instead of setting it explicitly asSetHintSizeMin()did, it does so indirectly by giving the widget a weight. The container holding this widget decides the size for all its held widgets according to their relative weights (If all widgets have the same weight, they all have the same size. If you double the weight of one of the widgets, its size will be double that of the other widgets). This is a complex topic explained in its own tutorial (coming soon).In the code above, the text widget is given a weight of
1.0in the horizontal direction and0.9in the vertical direction (both directions are treated separately). The effect of this on the final widget size depends on the other widgets' weights, so it is explained in the next section after all widgets have been created.SetHintAlign(): Once the container has allocated space for each widget according to its weight, if the actual widget is smaller, it has room to be aligned. This command controls horizontal and vertical alignment in this way:0means left (or top),1means right (or bottom), and intermediate values are possible, meaning intermediate positions. For example,0.5means centered, as used in the code.NOTE: A vertical box fixes the vertical size of all its contained widgets (and likewise an horizontal box). This means that they cannot be vertically aligned using
SetHintAlign()(only horizontally), because there is no room for movement in the vertical direction.If you want to vertically align the text inside a vertical box, you have to align the text inside the text widget using
SetValign(0.5)(orSetHalign(0.5)). This is a complex topic explained in it own tutorial (coming soon).Efl.Ui.Box.DoPack(): This adds the text widget to the box container. The order in which widgets are added to a container dictates the order in which they are placed on the screen.Besides being a child of the box object, the text widget also needs to be packed into the box with
DoPack().
Adding a Button
Let's now add a button below the text label:
        // Create a button widget
        var button = new Efl.Ui.Button(box);
        // Customize it
        button.SetText("Quit");
        button.SetHintWeight(1.0, 0.1);
        // Set the method to be called when the button is pressed
        button.ClickedEvt += (object sender, EventArgs e) => { Efl.Ui.Config.Exit(); };
        // Add the button to the box container
        box.DoPack(button);
This instantiates a button as a child of the box and initializes it so:
- Its label is set to
Quit. Its vertical weight is set to
0.1. The only other widget inside the box container is the text label created in the previous section, with a weight of0.9, so these two widgets will share the total height of the window at a 90% - 10% ratio.NOTE: You could also use
1and9for the weights, or10and90, to achieve the same results. Remember that the weights are relative.It defines a lambda function to be used as event handler for the
Clickedevent. In this way, when the button is pressed, the application will exit.- Adds the button to the box (besides being a child of the box object, the button also needs to be packed into the box with
DoPack()).
Summary
At the end of this tutorial you have learned:
- How to react to events like window a being closed or a button being clicked.
- How to use container widgets to take care of other widget's position and size.
- How to further customize a widget's position and size using size, weight and alignment hints.
Further Reading
- Setting up a C# Development Environment
- Read this before trying to develop with the EFL and C#
- "Hello World" in C#
- First tutorial in the series, explaining the basics.
- Tutorial Code Examples
- C# Source code for the tutorials.